Instagram reels, I am going to be honest with you, I have a love-hate relationship with them… On the one hand, they can be an awesome way to showcase your creative process, engage with your audience and grow your followers (most of my new followers nowadays come through reels). On the other hand, it can be time-consuming to create and edit the content for reels which takes away from your creative time. It’s like one of those recently trending audios for reels: “Oh I love it and I hate it at the same time”.
Anyway, after my tips for photographing artworks I thought it would also be fun to share some ideas about creating engaging reels! I’ll start with some basic tips, I will give you some specific ideas for reels, and I’ll end with a disclaimer about my personal experience with Instagram’s engagement and the everchanging algorithm struggles. Plus, I’ll end with a funny story about my most viral reel on Instagram.
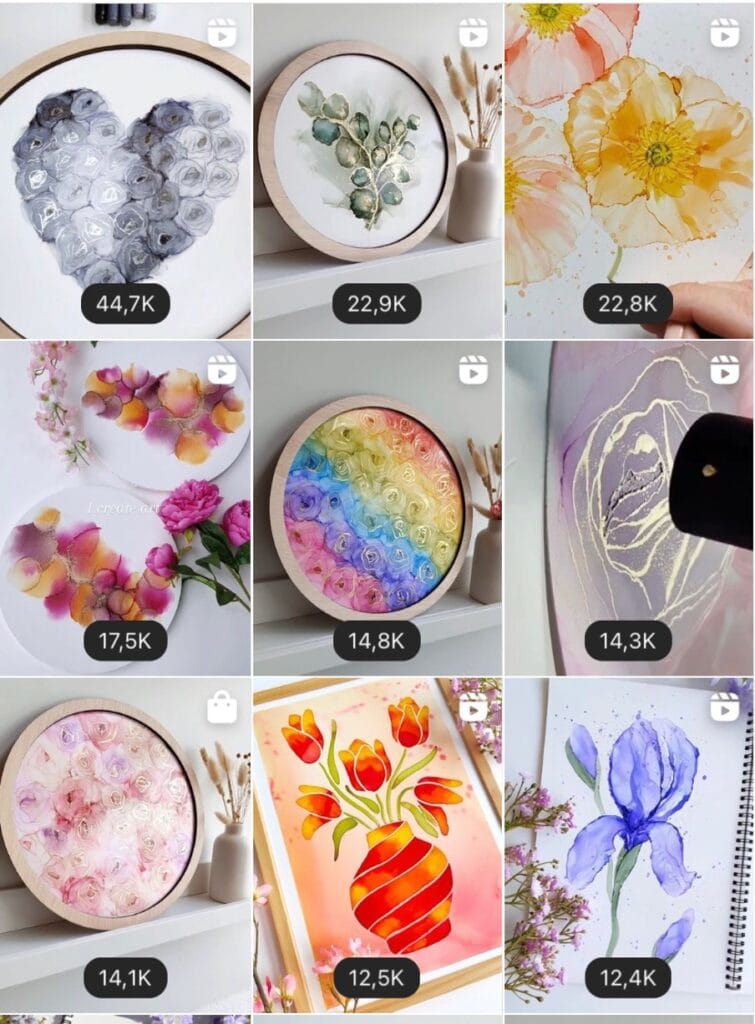
My best performing reels from the past 30 days
1. Start with a captivating hook
The first few seconds of your Reel are crucial in grabbing your audience’s attention. Begin with a visually stunning shot, or a surprising element that instantly piques their curiosity. I usually start with right away showing ‘action’. By hooking your viewers from the start, you’ll encourage them to continue watching and engage with your content. It also helps here to raise their curiosity by adding text like, ‘wait for it…’, or ‘see what this turns into…’.
2. Keep it short!
Reels engagement has everything to do with the audience being captivated and watching the entire video. So simply said, the shorter the video, the bigger the chance someone will watch the entire video, which will help in engagement. The average attention span of the social media user is so incredibly short, so I would advise to keep your reels at a max of about 20 seconds. However, there are super successful artists out there using 1 or 2 minute reels.
3. Use trending audio
This is a well-known strategy to help engagement. A trending audio means it’s currently rising in popularity and if you use the audio, chances are you will get engagement through people looking at reels through this audio. Trending reels are indicated by a tiny arrow next to the audio’s name if you are browsing reels. I personally don’t get to see these arrows so I usually just browse through reels and save some fun audios I haven’t heard before and are not used so much yet (under 10K). There’s also plenty of Instagram accounts that highlight trending audios, such as Eve Longfield.
Something that also works well in captivating attention: audios in which you hear someone talk, because people usually want to keep listening to hear what this person has to say. I often use inspiring quotes about the creative process. But please remember though that a lot of people might not have their audio on. Therefore, I sometimes like to add text to my reels.
See (hear) an example on my Instagram here.
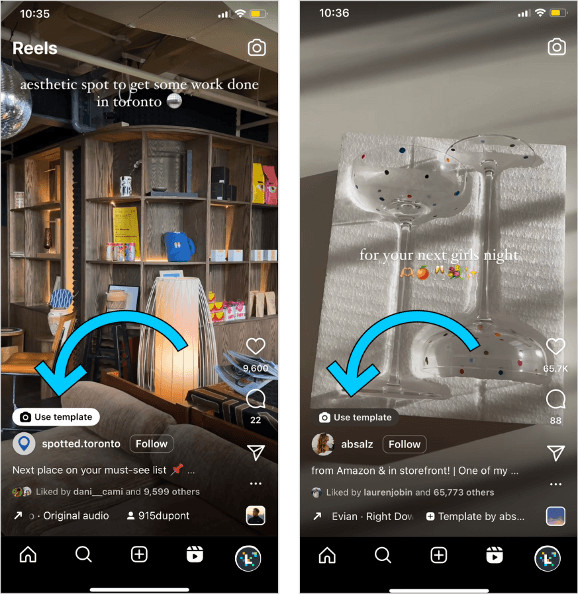
4. Use templates from other reels
Did you know you can use other reels as templates for your own? Some reels will have a button saying ‘Use template’ and if you click on it, it will use the same audio and length of the individual clips which you can fill with your own content. A real time-saver!
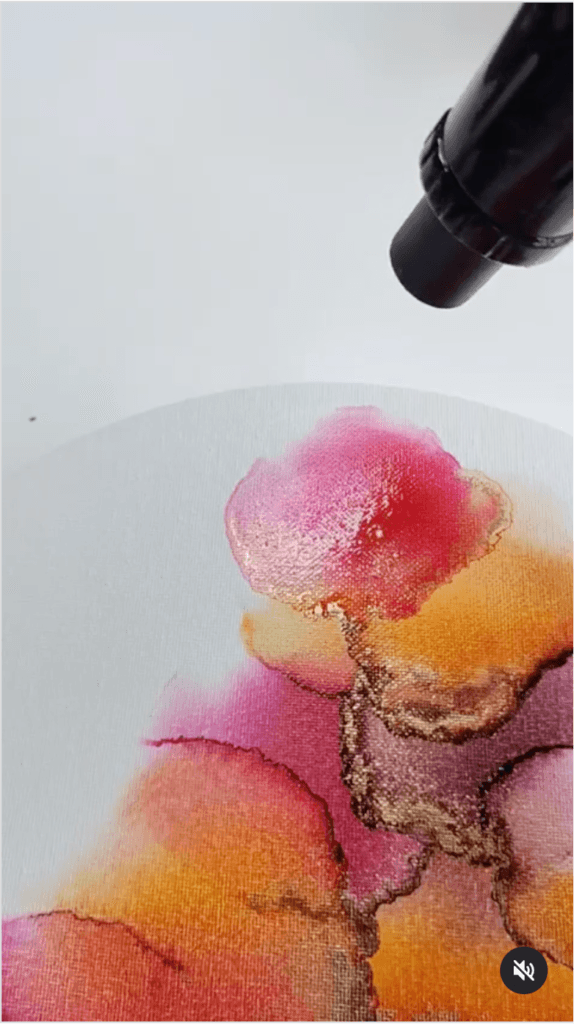
5. Use close-up shots and different angles
Reels in which I show close-up shots often perform better than a zoomed out shot. It also helps to show a different angle each time. What I sometimes like to do if I can invest a bit of time is having a more zoomed in and zoomed out shots (if that makes sense).
Check my Hearts of Roses video to see what I mean. I recorded this in one take, but I used more zoomed in and zoomed out shots to captivate the audience. Downside: this does take a bit of editing. I use Capcut for creating such reels.
Now that we’ve talked about some tips to use, you can combine them with some of these reels ideas!
Here’s some reel ideas I often use:
1. Timelapse Art:
I think timelapses of the creation process are some of the easiest ways to create reels that can be engaging to watch, although they seem to be less popular lately. The fast-paced nature of timelapse reels, combined with the intrigue of seeing the final result, can captivate audiences to keep watching until the end. Benefit: it doesn’t require a lot of editing. iPhone has a built in timelapse option, if your phone doesn’t there’s plenty of timelapse apps you can use.
Here’s and here is an example from my Instagram.
2. Showing glimpses of the process
A very popular reel strategy recently, is to show very short clips from 2 to 3 seconds max that each time show a very short glimpse of the creation process. This is a great way to keep the attention of the audience. Downside: it does take a lot of editing. I usually record short clips on my phone which I then edit into a reel. I often also take short clips from the tutorials I record for my tutorials and edit them into a reel. It can be difficult though choosing around 20 seconds of material out of a one hour video…
Here’s an example from my Instagram.
3. Show the before and after/transformation
People love a before and after and will want to keep watching until they see the result. There are multiple ways to show a transformation. If you do a process video, you will automatically show the beginning and end. For reels in which I show glimpses of the process, I usually also show the end result in video (in a nice flat lay or in frame). You can also simply show the beginning (a blank sheet and some inks) and then what it turned into. One final strategy I often use is to show me finishing up a flower. You’ll just see me add the stems and leaves and splatters and turn it into a flower. This is also a smart way for me since I don’t want to show all my techniques in the videos since I teach them in my tutorials.
I sometimes like to add sentences like, ‘see which flowers this turns into’ or ‘create a tulip with me’. This will raise the curiosity of the audience to keep watching what comes out.
Here’s an example from my Instagram.
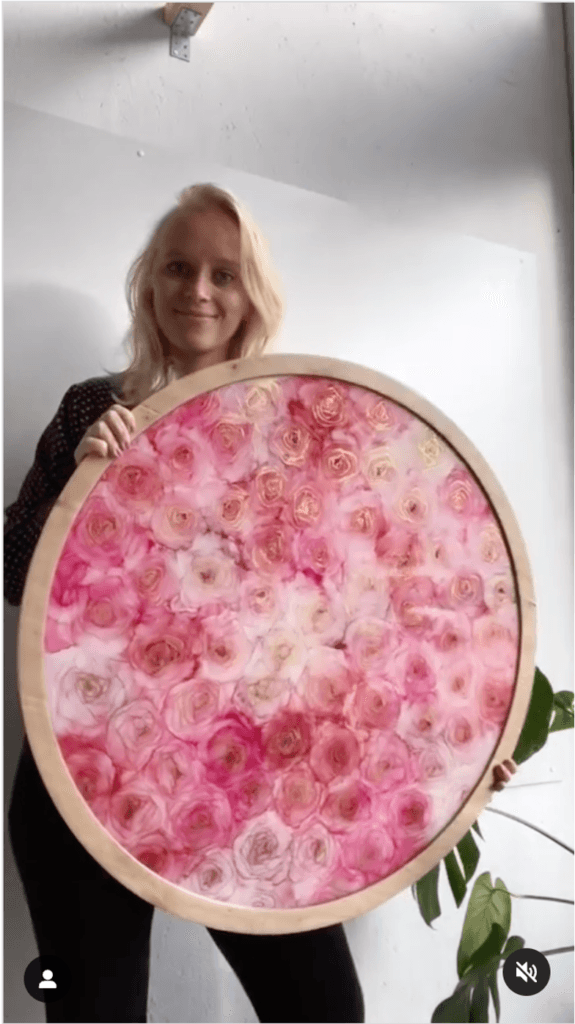
4. You and your artwork
Nothing grabs the attention more than when you yourself show up in your reel. I don’t show my face too often on Instagram, but for my bigger artworks I like to showcase them myself. This is usually much more engaging than only filming your artwork. I often like to show myself holding the artwork or putting it up on the wall or easel and show some close-ups of the artwork after. This is a great way to showcase your art and the person behind it. Here and here is an example from my Instagram.
My personal experience with Instagram engagement + Disclaimer:
I am by no means an Instagram engagement expert and especially with the algorithm it can feel like a black box what will perform well and what won’t. I experiment with formats myself and it can really be a hit and miss. Sometimes they perform super well, sometimes they plummet, but stability is not so much in Instagram’s vocabulary 😉 Even very similar reels (e.g., my roses videos) will perform completely different so there’s so many mysterious factors I am not able to grasp. I even experimented with posting an almost identical reel twice and one would plummet while the under one would go viral.
What I am trying to say with this is:
Try and not feel bad when a reel does not perform well. It doesn’t mean your content and even more importantly, your art is no good! It can be easy to get carried away with Instagram engagement and relate that to how you feel about your art. Enjoy the engagement when a video does perform well, but don’t let it influence how you feel about your art. Trust me, I have been there! If I would follow only what performs well on Instagram, I would basically mostly be creating roses and swatches all day. As always, it’s most important that you are enjoying your creative process and to see reels as a nice way to display that enjoyment to others!
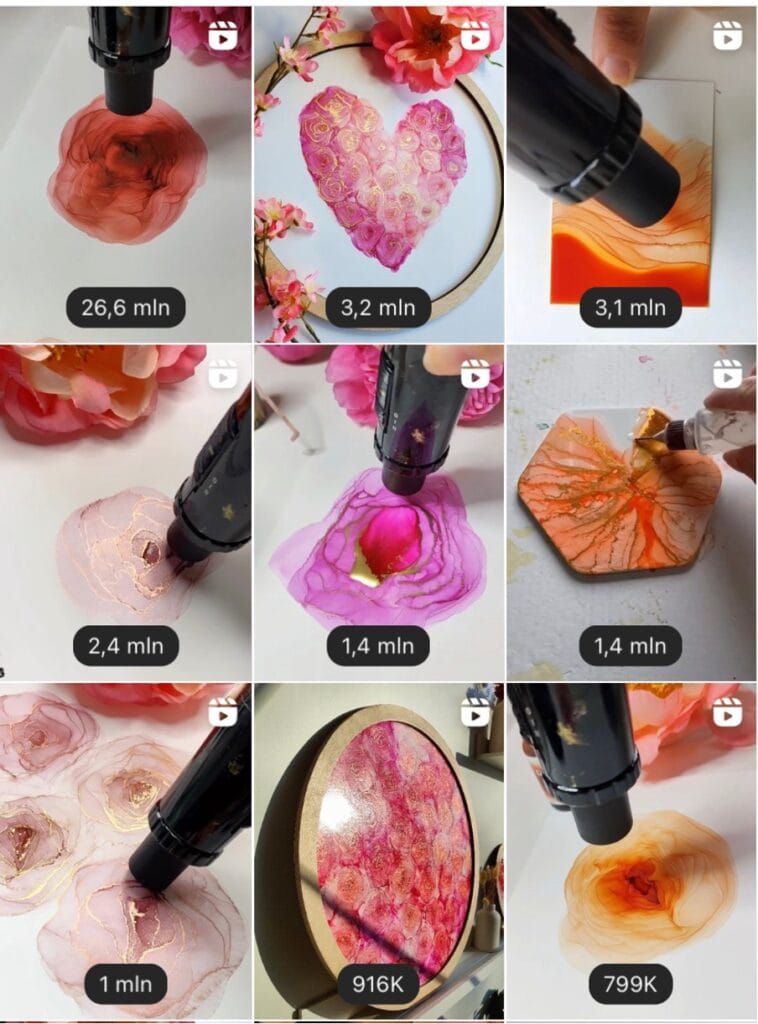
My best performing reels from the past year, see how almost all of them are roses videos!
P.s. Wanna hear a funny story about my most viral reel on Instagram?
I had posted a video of my creation of a red rose, like I very often do without giving it a second thought. Apparently, people thought the red color of the ink looked like blood, and to be more specific, menstrual blood. In no time, my video went insanely viral and by now hit over 26 million views (you can see it in the overview above). Did I feel bad about it? No, I could honestly laugh about it as I didn’t see it coming. And well, in the end I did gain a lot of new followers from the video… Click here to check the video and see if you agree 😉 (don’t forget to read the comments)
Want more tips? Don’t forget to sign up to my newsletter and also check out my other blogs.