If alcohol inks have one enemy, it is humidity. Especially in summer or with hot weather in general humidity can be very frustrating when you are trying to control your alcohol inks, because they just don’t want to be controlled (even more so than normally).
Recognize this? Then keep on reading!
Beating humidity is almost impossible but there are some things we can do to reduce the humidity effect, or even use it to our advantage. Before we go there, let’s talk about how you recognize humidity effects in case you are not sure whether it’s humidity causing problems.
How do you recognize humidity affecting your inks?
- Your inks produce a weird kind of moisture when you are trying to manipulate them (this sometimes also happens with bad quality inks)
- When drying, you see little water droplets appearing on your surface (often in a different color than the ink)
- Some inks will produce a weird kind of texture, almost as if it is breaking apart
- Your inks dry much more matte like than normal and sometimes it is even powdery and will lift off when you touch with your finger
- Especially when working with a heat tool, you will see crooked edges/ripples appearing where the wet ink hits the dried ink (see a video below)
Sounds familiar? Then you are definitely having humidity issues.
Luckily, there are SOME things we can do.
Here are my 5 tips to work with inks in high humidity:
1. Use aircon or a dehumidifier
Ok this is the most obvious one…
Aircon is the easiest solution to reducing humidity. So if you have aircon, turn it on 30 to 60 minutes before you start working with your inks and the humidity effect should be reduced or even absent. However, if you live in a place with a not so hot climate (like I am), it is very uncommon to have aircon and it can be expensive to purchase. An alternative to aircon is a dehumidifier, which, as the name says, will dehumidify the air in your room. This is also not a cheap solution, but may be worth the investment if humidity is a big issue. If you get one, make sure it is an appropriate one for your room size otherwise it won’t do the job. And if you’re spending money anyway, I advise to buy a dehumidifier combined with an air purifier, so it will also clean your air when working with alcohol inks.
For me, neither of these is an option since I work in my new studio with open ceilings so aircon or a dehumidifier would be, as we say in Dutch, ‘mopping with the tap open’. An equivalent to this saying would be ‘try to empty the ocean with a thimble’.
Luckily, there are some other things we can do to reduce humidity as much as possible.
2. Vent your room before you start working with your alcohol inks
Venting your room before you start working will reduce the humidity effect to some extent, as it will clean the air in your room and at least get rid of some of that humidity. Venting your room is a good idea anyway when working with inks, so keep those windows and doors open!
3. Use chilled isopropyl alcohol
If you follow me on Instagram you may have seen my experiment with chilled isopropyl alcohol, a tip that a follower gave me. Put your isopropyl alcohol ink the fridge or freezer (pure alcohol won’t freeze) before you start working your inks. I was super curious whether this would help. I experiment a little bit with my heat tool, and I was able to achieve better effects and details when working with the chilled alcohol. However, it is not THE magic solution, but will help to some extent.
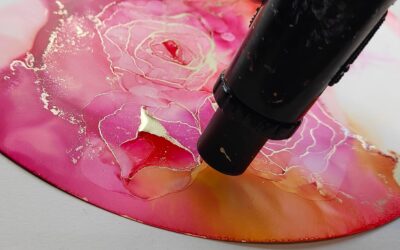
4. Reactivate your alcohol inks and work small
This one is especially good for working with a heat tool. If you do techniques like ripples (or roses), reactivating your inks after they have dried to rework them will help create finer details and ripples than directly trying to manipulate your inks (I am not sure why this is the case. Using less ink and more isopropyl will also help, as that makes the inks ‘easier’ to control (as I also advise in general to make it easier to work with inks). Lastly, the smaller you work, the easier it will be to get good results. For example, for my roses, I like to work in layers instead of creating the entire rose at once. Check out a video with tips here.
5. Add gold
Ok, this does not necessarily remove the humidity effect, it is just a clever way to cover up the humidity effect. Gold ink will produce nicer edges as it forms sort of a barrier for the inks to move further, so the lines won’t become as crooked as without using gold. And well, it’s always a good idea to add gold, isn’t it?
Now, if tip number 1 is no option for you and the other tips don’t help, we can still use humidity to our advantage. Because let’s be honest, when it’s a super hot summer day, these tips are just not going to do the job and working with alcohol inks will be super frustrating. So, let’s use it to our advantage!
Use humidity to your advantage
As said, humidity can produce a lot of texture in your inks. In some cases that may be unwanted, but if I am creating backgrounds for my florals, the texture can actually produce beautiful interest in my backgrounds that cannot be achieved normally. We cannot control these effects, so let’s just have fun and experiment with it. You could even go for this fun exercise [add link] to discover new color palettes.
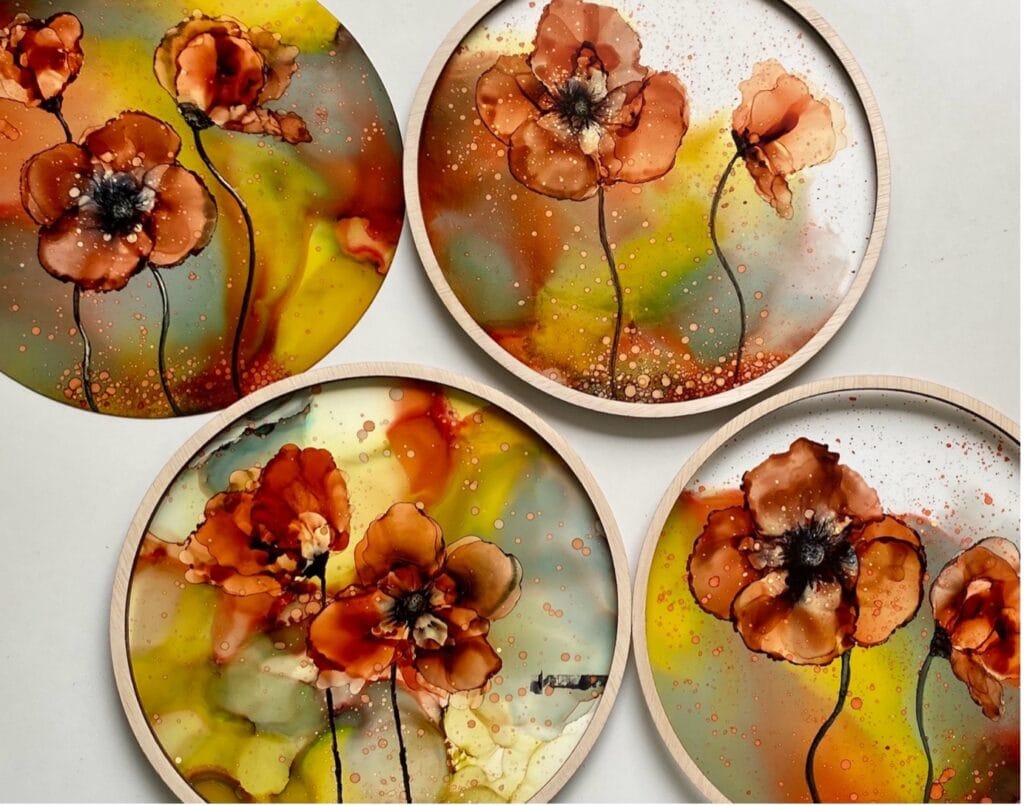
Fun fact is that I came up with the basics of my poppy flower style BECAUSE I couldn’t do my normal heat tool techniques in summer. And well, I created two entire online courses out of this style, that may not have been here if it wasn’t for the high humidity.. 😉
If you want to play with the humidity effect for texture, I advise to use an ink blower for manipulating your alcohol inks. Heat tool techniques like ripples are just very difficult to achieve with humid weather, so I tend to stay away from that on hot days.
The good news is, most of the tutorials in my Alcohol Ink Florals courses are humidity friendly BECAUSE we solely use an ink blower. That does not mean the humidity won’t affect our inks, but most of the effects can also be produced in high humidity, even though they may just look a little bit different. If you’d like to get started with my humidity friendly floral tutorials, check out my two courses Alcohol Ink Florals Part 1 and Part 2.
Now if ALL else fails, just enjoy a nice summer day outside, or change mediums for a bit! 😉
P.S. In case you want to see what the humidity level in your room is, you can get a hygrometer for a few bucks.